Sunday, January 31, 2016

Stuffed shells

My kids call these alligator mouths, but they're the best stuffed shells! It was my go to record for a while but then I lost track of it. So glad I've found it again!

Chicken and Spinach Stuffed Shells
Submitted by Erin (Brittany’s delicious recipe. :) )

44 uncooked jumbo pasta shells (That’s about one and one-half 12-oz boxes)
2 c chopped cooked chicken
2 c fresh chopped spinach
1 onion, chopped
2 cloves garlic, minced
1 (15oz) container ricotta cheese
2 (8oz) packages cream cheese, softened
1 (5oz) package shredded Parmesan cheese (about 1 2/3 c.)
1 large egg, lightly beaten
1 Tb dried parsley flakes
1 tsp Italian seasoning
1/2 tsp salt
1/2 tsp pepper
2 c shredded mozzarella cheese, divided
1 (26oz) jar prepared spaghetti sauce (any variety)

Cook shells according to package directions (be sure to stir every once in awhile so they don’t stick to the bottom of the pan and tear apart); drain and set aside.
Preheat oven to 350°. Lightly grease 2 13x9x2inch baking dishes.
In a large bowl, combine chicken and all the rest of the ingredients except mozzarella and spaghetti sauce. Stir in 1 cup mozzarella. Spoon into shells. Spread half of spaghetti sauce into prepared baking dishes. Arrange shells over sauce; top with remaining sauce. Cover tightly with heavy-duty aluminum foil. Bake, covered, for 40 minutes. Uncover, sprinkle with remaining 1 cup mozzarella. Bake for 5 to 10 more minutes.
Makes 8-10 servings.

Saturday, January 30, 2016

Faux pho

6 cups beef broth
4-6 in cinnamon stick
1 garlic clove
1 t ginger
2 star anise
Handful dried shiitake
1/4 c died onion
Simmer together

Bring to boil add rice noodles and thinly sliced brisket.

Tuesday, December 15, 2015

Gingerbread

FOR THE COOKIE:
6 cups All-purpose Flour
1 teaspoon Salt
2 teaspoons pumpkin pie spice
3/4 cups Margarine Or Softened Butter
1-1/2 cup Firmly Packed Brown Sugar
1/2 cup Molasses
1/2 cup maple syrup
2 whole Eggs
1 Tablespoon vanilla Extract 

FOR THE ROYAL ICING:
2 pounds Powdered Sugar, Sifted
1/3 cup Whole Milk, Plus More If Needed For Thinning
2 whole Large Egg Whites 
Miscellaneous Candies, Sprinkles, And Other Decorations

INSTRUCTIONS

In a large bowl, combine the flour, salt, allspice, cloves, ginger, nutmeg, and cinnamon. Set aside.

In a mixer, beat the margarine (or butter) and brown sugar until fluffy. Drizzle in the molasses, mixing well and scraping the sides of the bowl a couple of times to make sure it's evenly combined. Add the eggs and maple extract and mix. Add the flour mixture in three batches, beating until just combined after each addition. 

Wrap the dough in plastic wrap and refrigerate for at least 2 hours or more if you have time!

When you're ready to bake the cookies, remove the dough from the fridge and preheat the oven to 350 F. When the dough is soft enough to roll but still firm, divide it in half and roll out each half between 2 sheets of plastic wrap (dividing it in half just makes it more manageable.) Cut out shapes of your choosing and place on a baking sheet lined with parchment or a baking mat. Bake for 12-15 minutes, depending on the size of cutters used, until the cookies are baked through but still soft. Remove with a spatula and allow to cool completely.

Thursday, August 6, 2015

Kale Salads

So I had this salad at Zupas once and completely fell in love with it... I make it at least once a week.

I've never really written down a recipe for a salad before so I'll just list the ingredients and you can adjust how much you want to put in. Let's call it a matter of personal taste instead of my laziness mmkay?

Ingredients:
*Sweet Vinaigrette of some kind (basic recipe below)
*Kale (any kind curly/ not red/ green mix it up)
*Blueberries
*Grapes (I normally use red, but this time green was cheaper...)
*Pistachios
*Quinoa, cooked
*Dried Cherries
*Optional Parmesan cheese (just don't use the powdered green can stuff)

Vinaigrette:
4 tablespoons white wine vinegar
2 tablespoons peeled fresh garlic
8 tablespoons freshly squeezed lemon juice
1/2 teaspoon salt
2 cups extra-virgin olive oil
2 teaspoons Dijon mustard
Freshly ground black pepper
Sugar to taste (arround 1/2 cup)

Mix together in a blender.

 Toss everything together. If I'm feeling extra fancy I'll cut the grapes in half.

Also on a side note, if your kale is more tough than tender massage the heck out of it before you throw the salad together. It's tough it can take it but it'll soften it up and make it nicer to eat.


Mango Variation:
*Same vinaigrette
*Kale
*Fresh mango cubed
*Almonds
*Dried Cherries
*Quinoa


Monday, March 16, 2015

Irish soda bread

Ingredients
1 pound (450 grams/ 3 1/4 cups) white flour, preferably unbleached
1/2 American teaspoon salt
1/2 American teaspoon bread soda ( baking soda)
Yogurt or buttermilk to mix - about 12 to 14 fluid ounces 


Directions
First fully preheat your oven to 450 degrees F (230 degrees C).

Sift the dry ingredients. Make a well in the center. Pour all of the milk in at once. Using 1 hand, mix in the flour from the sides of the bowl, adding more milk if necessary. The dough should be softish, not too wet and sticky. When it all comes together, turn it out onto a well floured board.

WASH AND DRY YOUR HANDS. Knead lightly for a second, just enough to tidy it up, flip over. Pat the dough into a round about 12 inches (2.5 centimeters) and cut a cross on it to let the fairies out! Let the cuts go over the sides of the bread to make sure of this. (FYI this is actually pretty critical. The bread is so dense the center has a hard time cooking through. This helps heat get to the middle)
Bake in a hot oven for 15 minutes, then turn down the oven to 400 degrees F (200 degrees C) for 30 minutes, or until cooked. If you are in doubt, tap the bottom of the bread: if it is cooked it will sound hollow.

Soda bread only takes 2 or 3 minutes to make and 20 to 30 minutes to bake. It is certainly another of my 'great convertibles'. We have had the greatest fun experimenting with different variations and uses. It's also great with olives, sun-dried tomatoes or caramelized onions added, so the possibilities are endless for the hitherto humble soda bread.


Read more at: http://www.foodnetwork.com/recipes/white-soda-bread-recipe.html?oc=linkback

Tuesday, December 16, 2014

Christmas Tamales

Masa:
For every 2 cups of masa harina (meal), add ½ cup of shortening or lard, 1tsp. of salt, and 1tsp baking powder (optional: enough chili powder to make a pink dough). Add broth mixture a little at a time to masa and mix with your hands to get a smooth, spreadable consistency. If you run out of broth, you can use hot water. (Use about 1:1 ratio with masa) whip till fluffy.

Pinto bean & cheese filling:
Beans:
Fill crock pot half full with rinsed beans. Add one onion, and 3 cloves of peeled garlic. Fill with chicken broth until 3-4 inches above beans. Cook on high until soft. Blend or mash until smooth.
Optional: mix in enchilada sauce
1/4 c oil
2 T flour
1/4 c chili powder
8 oz tomato sauce 
1 1/2c water
1/4 t cumin
1/4 t garlic powder 
1/4 t onion powder 
Salt to taste 

  1. Heat oil in a skillet over medium-high heat. Stir in flour and chili powder, reduce heat to medium, and cook until lightly brown, stirring constantly to prevent burning flour.
  2. Gradually stir in tomato sauce, water, cumin, garlic powder, and onion salt into the flour and chili powder until smooth, and continue cooking over medium heat approximately 10 minutes, or until thickened slightly. Season to taste with salt.
Cheese: small slice quest fresco

Green Chili Chicken:
COOKED SALSA VERDE

2 pounds green tomatillos, husks removed and rinsed

2 garlic cloves, peeled

2 serranos chiles, or more to taste

1 cup cilantro leaves

1/4 cup white onion, roughly chopped

1 teaspoon kosher or sea salt, or to taste

2 tablespoons safflower or corn oil


Place the tomatillos along with the garlic cloves and the chiles serrranos in a pot and cover with water. Place over high heat until it comes to a boil. Simmer at medium for about 10 minutes, or until tomatillos change their color from a bright to a pale green, are cooked through and are soft but are not coming apart.

Place tomatillos, garlic and chile (you may add one chile first) and 1/2 cup of the cooking liquid in the blender and puree until smooth. Incorporate the cilantro leaves, onion and salt and process again. Taste for salt and add more if need be. Also taste for heat, you may add the other chile in pieces until you reach your desired heat level.

Heat the oil in a pot over medium heat. Once it is hot but not smoking, pour in the sauce and bring it to a boil. Simmer over medium heat for 6 to 7 minutes, until it thickens a bit and deepens its flavor and color. Turn off the heat.

Once it cools down, you may store it in a closed container in the refrigerator for weeks. However, the heat level of the sauce will diminish as the days go by.

© 2010-2014 MEXICAN TABLE, LLC. ALL RIGHTS RESERVED


Chicken

Place in crockpot covered in broth with onion and garlic. Cook till tender. Shred and mix with salsa verde.

Beef:

Cook meat (pork or beef, or both in separate pots) in a large pot of water (or in a slow-cooker filled with water) with an onion, 2 garlic cloves, 1 teaspoon of chili powder, salt and pepper. Cook for the day, 4 hours minimum. The more broth you can generate from the meat, the better!

After the meat is cooked (so that it falls apart and shreds easily), remove from pot, set aside to cool, and puree the onion and garlic with the broth. Season broth mixture to taste with chili powder and salt.

Shred meat finely with two forks (you can even chop it after shredding), and store covered in refrigerator separately from broth. (Use broth to make masa)

Season shredded meat with chili powder, salt, and cumin (optional) to taste. As you season the meat, add a small amount of broth to moisten meat, but it should not be runny.

Cream Cheese, bacon, jalapeño

Purée jalapeños, bacon, and cream cheese to taste

This time I did about 4 jalapeños, 8 strips of bacon, and 3 boxes of cream cheese.


Assembling 

Assemble the tamales: spread masa about 1/8 inch thick on corn husk with fingers, leaving about ½ inch border along the sides and 2 inch border along the top and bottom of husk. Use about 2 Tbsp. of shredded meat to fill the tamal (like a cigar). Fold sides until they just overlap, fold narrow end under, and place tamal folded side down. Grandma Salazar tears thin strips of the corn husks to tie a “little belt” around each tamal to keep it secure. Although this isn’t necessary, it does look the nicest and makes each tamal a little gift to be opened.

Cooking 

To cook, steam fresh tamales for 15 minutes or until masa is no longer sticky.

Freezing 

Store in freezer. Steam frozen tamales for 20 minutes. (This is a real treat a few days or a few weeks later. After you’ve recovered, it’s almost like someone else made them for you!).


Friday, July 11, 2014

Ratatouille

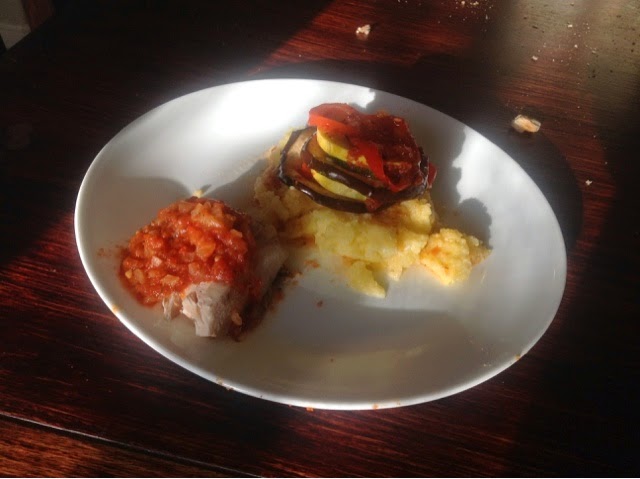
I've always wanted to try ratatouille after seeing the movie so when it came up in my search for a healthy summer recipe I knew it was time. This was amazing! I was strapped for time making it so mine wasn't as pretty as it could of been but it was delicious. We served it with polenta and grilled chicken.


Layered Ratatouille

YIELD: Makes 4-6 servings

INGREDIENTS:

1/2 onion, finely chopped
2 garlic cloves, very thinly sliced
1 can garlic and olive oil diced tomatoes puréed 
¼ tsp. oregano
¼ tsp. crushed red pepper flakes
2 tablespoons olive oil, divided
1 small eggplant, such as Italian or Chinese
1 zucchini
1 yellow squash
1 long red bell pepper
Salt and pepper

DIRECTIONS:

Preheat oven to 375 degrees F.

Pour tomato puree into bottom of an oval baking dish, approximately 10 inches across the long way. Drop the sliced garlic cloves and chopped onion into the sauce, stir in oregano, crushed red pepper flakes, one tablespoon of the olive oil, and season the sauce generously with salt and pepper.

Trim the ends off the eggplant, zucchini and yellow squash. Trim the top of the red pepper and remove the core.

On a mandoline, adjustable-blade slicer or with a very sharp knife, cut the eggplant, zucchini, yellow squash and red pepper into very thin slices, approximately 1/16-inch thick.

Atop the tomato sauce, arrange slices of prepared vegetables concentrically from the outer edge to the inside of the baking dish, overlapping so just a smidgen of each flat surface is visible, alternating vegetables. You may have a handful leftover that do not fit.

Drizzle the remaining tablespoon olive oil over the vegetables and season them generously with salt and pepper.

Cover dish with a piece of parchment paper cut to fit inside. Or tinfoil

Bake for approximately 45 to 55 minutes, until vegetables have released their liquid and are clearly cooked, but with some structure left so they are not totally limp. They should not be brown at the edges, and you should see that the tomato sauce is bubbling up around them.

Serve with a dab of soft goat cheese on top, alone, or with some crusty French bread, atop polenta, couscous, or your choice of grain.

Enjoy!

Recipe adapted from http://www.thecomfortofcooking.com/2010/08/layered-ratatouille.html


Sunday, May 18, 2014

Kolaches

When we were in Houston last week I remembered how delicious kolaches are! Unfortunately, there are none to be found in the middle of the desert that is centeral Utah. So I googled around to see if I could find a recipe. I found this gem of an article about an old Czech grandma and was sold.

http://www.caller2.com/2001/october/17/today/fea-food/14846.html

They turned out well, my freezer is stocked, and my Texas craving is satisfied for the moment. Now if I could just get Franklin's recipe...


   3 cups warm milk 
   ¾ cup melted Oleo or butter 
   ¾ cup sugar 
   1 tablespoon salt 
   3 egg yolks 
   7 cups flour 
   3 tablespoons dry yeast 
   Place ingredients in mixer in the order listed above and blend on medium speed for 10 minutes. (The longer you beat it, the nicer the dough.) 
   Let rise for 1 hour. (If you're in a hurry, speed up the process by placing the container of dough in a container of warm water for 40 to 45 minutes.) 
   Work dough into balls and place on cooking sheet coated with cooking spray. Let dough balls rise for 15 to 20 minutes. Using fingers, press down in middle of dough to create cavity for filling. Add filling and crumb topping and allow kolaches to rise again while oven preheats (about 10 to 15 minutes). 
Bake 18-20 minutes 375-400*

You can fill or top them with whatever your heart desires. We did cottage cheese, peach jelly, ham and cheese, and sausage.

Check out the recipe link for some authentic options.

Monday, April 7, 2014

English muffins recipe


2 1/4 c. (10 oz) bread flour
1/2 T. (.25 oz) sugar
3/4 t. (.19 oz) salt
1 1/4 t. Instant yeast
1 T. (.5 oz) shortening or unsalted butter, room temperature
3/4 to 1 cup (6-8 oz) milk or buttermilk, room temperature
Cornmeal for dusting, optional

1. Stir together flour, sugar, salt, and yeast. Stir in shortening/ butter and 3/4 cup milk until ingredients for a ball. If there is still loose flour, dribble in so me of the remaining milk. The dough should be soft, pliable, not stiff.

2. Knead dough for about 10 min, dough should be tacky but not sticky. It should pass the windowpane test. Transfer dough to a little oiled bowl. Cover with plastic wrap.

3. Ferment at room temperature for 60-90 min, or until dough doubles in size.

4. Shape into a loaf if making English muffin bread. Or Divide dough into 6 pieces 3 oz each. Shape into a boule, similar to a roll. Spray a baking pan with oil. Transfer balls of dough to pan, spacing them 3 in apart. Mist lightly with oil then loosely cover with plastic wrap. If you are making these the night before for breakfast now you can place them in the fridge. Just remove a few hours before you are planning to cook them so they can warmup and rise.

5. Proof for 60-90 min until nearly doubled.

6. Heat skillet medium heat (350*F). Also, preheat oven to 350*F

7. Brush pan with oil if not using nonstick. Uncover the muffin rounds and GENTLY transfer them to the pan. Fill the pan so the pieces are 1 in apart, not touching. Cover remaining pieces.
Cook for 5-8 min or until the bottom of the dough is about to burn. The bottoms should be dark, they will brown quickly but won't burn for awhile so resist the temptation to turn early or they will fall flat. Carefully flip and cook for another 5-8 min. Transfer to sheet pan and place in oven, don't wait for others to cook. Bake for 5-8 min. Meanwhile cook remaining pieces.

8. Transfer to a cooling rack and cool for 30 min before serving.

**instead of cutting them open with a knife use a fork. The advantage is that by running the tines of a fork into and around the the edge of the bread, the famous nooks and crevices are created.

Sunday, March 23, 2014

Homemade Chef Boyardee: Beefy Macaroni Tomato Soup in a crockpot


My husband doesn't see it but this recipe has a certain Chef Boyardee nastalga for me. I started with a recipe for tomato macaroni soup but didn't have half the ingredients so I started improvising.

1 can of condensed tomato soup
1 can of water
1 can of died tomatoes
1 full size can tomato sauce
2-3 bay leaves
1/2 teaspoon garlic powder
1/2 teaspoon onion powder
1/4 teaspoon ground celery seed
1/2 teaspoon basil
1 lb cooked ground beef 

I tossed everything in the crock-pot on high for 3.5 hrs.

Then added:
2 cups chicken stock
4 handfuls of uncooked macaroni

Let cook till macaroni is tender. Enjoy:)

This recipe received 2 thumbs up!


Monday, March 17, 2014

St. Patrick's Day 2014

This year we had a blast with a cousin dinner for St. Patrick's Day. I think it might have been my favorite recipes so far!

CORNED BEEF:
I'm not sure I knew how delicious this stuff was until I started making it from scratch. I used Alton Brown's recipe again this year, but with a few tweeks.
http://www.foodnetwork.com/recipes/alton-brown/corned-beef-recipe.html

Ingredients
2 quarts water
1 cup kosher salt
1/2 cup brown sugar
2 tablespoons saltpeter (omitted because I couldn't find it)
1 cinnamon stick, broken into several pieces
1 teaspoon mustard seeds
1 teaspoon black peppercorns
8 whole cloves
8 whole allspice berries
12 whole juniper berries (
omitted because I couldn't find it)
2 bay leaves, crumbled
1/2 teaspoon ground ginger
2 pounds ice
1 (4 to 5 pound) beef brisket, trimmed
1 small onion, quartered
1 large carrot, coarsely chopped
1 stalk celery, coarsely chopped

Directions
Place the water into a large 6 to 8 quart stockpot along with salt, sugar, saltpeter, cinnamon stick, mustard seeds, peppercorns, cloves, allspice, juniper berries, bay leaves and ginger. Cook over high heat until the salt and sugar have dissolved. Remove from the heat and add the ice. Stir until the ice has melted. If necessary, place the brine into the refrigerator until it reaches a temperature of 45 degrees F. Once it has cooled, place the brisket in a 2-gallon zip top bag and add the brine. Seal and lay flat inside a container, cover and place in the refrigerator for 10 days. (Mine was closer to 2 weeks) Check daily to make sure the beef is completely submerged and stir the brine.

After 10 days, remove from the brine and rinse well under cool water. Place the brisket into a pot just large enough to hold the meat, add the onion, carrot and celery and cover with water by 1-inch. (I felt last year that I could use some more flavor. So this year I added some mustard seed, cinnamon, allspice, and cloves inTo the pot as well) Set over high heat and bring to a boil. Reduce the heat to low, cover and gently simmer for 2 1/2 to 3 hours ( I cooked mine in the crock pot for 5 hrs) or until the meat is fork tender. Remove from the pot and thinly slice across the grain.

WHEATEN BREAD:
This stuff was amazing! I realized after I mixed all my ingredients that I was using a 1/2 t. Instead of the 1/4t. I thought I was. Thus everything had been accidentally doubled! What could I do? I double the remaining ingredients and made two. It turned out so well I'm glad I had the extra! I did sub the buttermilk for some homemade yogurt and milk.
http://www.ourbestbites.com/2010/03/irish-wheaten-bread-brown-soda-bread/

SODA BREAD:
Not my favorite recipe this year. Turned out really dry :(

ROASTED POTATOES:
These were delicious! I roasted the potatoes with a head of garlic and they turned out amazingly!
http://www.webmd.com/food-recipes/features/roasted-vegetables-recipes-tips

RYE BREAD:
I used the transitional rye bread recipe from Peter Reinhardt's, whole wheat book, very much a do again. Made amazing Ruben sliders the next day.

BOILED CABBAGE:
I just used the basic recipe in Danny's veggie book. Basically, you boil a small amount of salted water, add the cabbage wedges, then cover to steam until tender. Then, I lightly salt and pepper.

I wish I had pictures but the food was so good, it just disappeared!

Monday, July 25, 2011

WGB Challenge

I'm sorry I have been MIA with the challenge as of late. I have been baking for the most part just not updating, but I'm kind of dropping out of that too now.

We've got another little 'bun' in the oven and I have been either too tired or too sick to want whole grain breads. So after we had several loafs of bread go moldy on the counter top and no sandwich bread for lunches I am having to reassess my priorities. I am so glad you all decided to bake along with me and I wish you luck as you finish the book, but I'm done with the schedule. I'll still be baking from it, but at my stomach's pace. I have also been missing all of that wonderful white bread from the BBA and will be revisiting that as well.
Thanks so much! I'll still be posting my baking adventures here and following the group in the meantime though I'll be eating some of this:
mmm Turtle Cheesecake!

Sunday, July 3, 2011

WGB: Tansitional Challah

So it has taken a while for us to get this up, sorry about that. This is danny typing this one, I have been enjoying baking this stuff along with Jenni(Ok ok, I have enjoyed eating this bread and helping in a somewhat anemic way, I am trying to get better about helping as well as eating).

Anyway I was excited for the challah since that was one of our favorite breads from the Bread Bakers Apprentice challenge that jenni participated in before(last year or the year before?). Since we are a little behind getting the post up it might not be as helpful now but we found then and it rang true for the wheat version that challah makes the best french toast you have ever had. Unfortunately, I don't think we got any pictures of the french toast we made. Sometimes the willpower needed to go get the camera and take a picture versus the desire to just snarf everything in sight immediately just isn't strong enough.

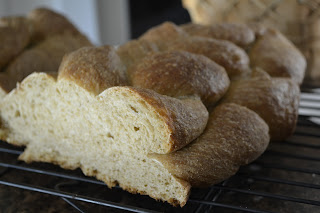
Anyway here are some pictures of how our challah turned out.
We really liked doing the braids, I don't think it was mentioned in this book but his earlier book mentioned that it was a traditional jewish bread and that the traditional way had 12 turns to signify the 12 tribes. We thought it was a kinda cool extra tidbit, so we try to make the twelve twists every time. We were both really dissappointed that we didn't notice the multiple braided styles that he demonstrates in this book till after we had baked our bread. We just stacked two smaller separate pieces that were braided independently. I really want to try that many-braid method it just looks so cool.
So hopefully everyone else had theirs turn out yummy like ours. It was pretty good and I think it has already totally disappeared.

So I tried to gather up some links to everybody else posts. I think these are all of them. Wow we have some good bakers and photographers chiming in. Sorry if our blog level/picture/detail level isn't quite up to snuff, the 16 month old monster(That we love) running around here takes up quite a bit of time.
Susie's
Jim's
Rob's
I'm sure I missed somebodies sorry about that. I can re-edit this and toss them on or you can comment here or in the google group. Oh and we are making the soaker for the transitional hearth bread tonight so we can make it tomorrow. WooHoo go holidays, anyway we should get this one up sooner.

Friday, June 24, 2011

WGB: Cinnamon Rolls

 I planned on making these beauties for breakfast on Father's Day. Well... we ate them for dessert instead.
I suppose that is a better category anyways.
 Mmm, they look so good someone just couldn't wait!

I'm still looking for a gooey cinnamon roll like the kind you buy at the mall. I added some extra cinnamon and sugar, but I guess my conscious won't let me add enough.

Friday, June 17, 2011

Kneadless Pot Bread

After hearing about my Whole Grains challenge a friend of ours suggested a book by Nancy Baggett entitled Kneadlessly Simple: Fabulous Fuss Free No-Knead Breads.
I must say that the simplicity of these breads is over exaggerated in my opinion. Yes you don't have to knead them, but they still take 2-3 days with various care in between. I do think though that once you learn her process better it would become simple, but I don't think Peter Reinharts bread are anymore complex. (well maybe a little)

That said, I love the crust and moist crumb on this bread. We ate it with french onion soup and it was the perfect soup bread. Spongy enough to soak up the broth, but with enough integrity to hold up. I am very intrigued by pot breads now and intend to look more into those.  

WGB: Transitional Rye Bread

I have to be honest up until the Bread Baker's Apprentice I thought I didn't like rye bread. I was surprised by how mild rye flour can be when I baked for that challenge. That said this was my least favorite sandwich bread thus far. My bread turned out dense with a very tight crumb. My husband liked it, but I found it much to dense for a sandwich. It did make good toast though.

Here are some other posts from by fellow bakers:
Ovenminded
Susie's Home and Hobbies

On to the cinnamon rolls! I'm stepping out of the loaf breads for this one in honor of Father's Day. We'll be baking these for breakfast on Sunday.

Monday, June 13, 2011

WGB: Transitional Multigrain Revisited

Sorry this post is a little late, but hopefully I get an extension because this is try 2. The same thing happened this time though! It was raising beautifully then it fell in the oven. I think however that this time it was due to the dough being too wet. I was trying to see how wet I could keep my dough and I think I found the limit. This bread is quite tasty though. I even caught my 1 yr. old smelling it as he ate it :)

Here's some more from my fellow challenge bakers:
Susie's Home and Hobbies
Exorphin Junkie


Wednesday, June 8, 2011

WGB: Transitional Multigrain Sandwich Bread

I am planning on baking this bread again on Friday for some reason it fell in the oven :( It still makes very good toast, but is a little dense for sandwich bread. I figured I'd share a little teaser picture.

Tuesday, May 31, 2011

Transitional Whole Wheat Sandwich Bread

 Okay so I've made this bread several times now.  I thought I would post pretty early so that I could share some of what I've learned. Sorry about the photo quality my digital camera has gone missing in action :(   Fortunately, it helped me to finally take the jump to a DSLR which is ordered and will be here in a few weeks. :) So until then all I have are cell phone pics. 
Here is my first soaker and biga.
 Mise en place,  soaker and biga all chopped up.


Oops! I forgot to turn down the temperature of my oven after I added the bread :( Tasted ok but the crust was a bit overdone and the crumb was dry.
So the second time was Memorial Day so with our added time my husband and I decided to try an experiment. A loaf each with
Biga, Instant Yeast & Scalded Milk
Biga, Instant Yeast & Unscalded Milk
Wild Yeast, Sourdough Starter & Scalded Milk
Wild Yeast, Sourdough Starter & Unscalded Milk

It got a little crazy with all the different types of dough so we wrote out an index card with each combination and moved it with the dough through each step.
You can see our index cards in this picture as well as the variation in rises.
1. Wild Yeast, Unscalded Milk
2. Wild Yeast, Scalded Milk
3. Biga, Scalded Milk
4. Biga Unscalded Milk

So we actually ended up with 4 distinctive end products. I personally preferred the taste of 4. I think that is because it was allowed to brown a bit more and thus had a nuttier flavor. It was hard to beat the rise of 1 and 2. Though before you run out and start your own starter I think the raise was more due to the moisture content of the dough than the starter. Our starter was a lot wetter than the Biga. This led to better kneading and softer dough so that more gluten developed and was allowed to create longer threads.

It was really awesome to see all these results right next to each other so that I could gain a better idea of how to control the process. I think I might keep making several loafs at a time for the sandwich breads at least. Since my family always is in need of sandwich bread anyways.

Oh and scalded vs. unscalded? minor differences not really worth the work in my opinion but that may be because we're using store bought pasteurized milk to begin with. (Edited to add a little caveat to be aware of, the hydration level of the scalded milk breads was lower and needed to be corrected. This was because we measured out even amounts of un-scalded milk for both versions which meant that the actual amount of liquid was a little low in the scalded version due to evaporation.)


Saturday, May 28, 2011

Preheat Your Ovens!

I hope everyone is excited to start baking this week. I've created a google group here http://groups.google.com/group/wgb-challenge.

This week we're starting with the Transitional Whole Wheat Sandwich Bread.

Good Luck!